This page offers step by step instructions on how to build a wooden raised wicking bed. The length can vary, but in this case the instructions are for a 3.6 metre long by 1.2 metre wide bed. For information about how wicking beds work see the WICKING BEDS webpage.
Most materials listed were obtained from my local hardware store. This list should only be seen as a rough guide. I suggest you vary it according to your own design modifications and what materials are readily available.
- 5 MM DRILL BIT
Preferably long length but the standard length is adequate. This is used to drill the pilot holes. - 22 MM WOOD DRILL BIT
- HEX SCREW BIT
Only if using bugle baton screws. - 90 DEG. ANGLE CLAMP
One is adequate but four will make things a little easier. - POWER DRILL
- STAPLE GUN
- CIRCULAR OR HAND SAW
- SET SQUARE
- PACKET OF 15 MM BUTTON SCREWS
- 100 MM BUGLE BATON SCREWS OR 125 MM GALVANISED BULLET HEAD NAILS
Other types of screws can be used but I have found bugle baton screws to be ideal as they are robust enough not to break under tension and sit flush with the timber, no unsightly knobs. - 40 250 X 9MM GALVANISED DECKING SPIKE NAILS
For later raised bed construction jobs I used Buildex 250mm Landscaping Construction Screws. They are more expensive than nails but are easier to put in. - FOUR 3.6 X 50 X .2 METRE LENGTHS OF TREATED PINE LANDSCAPE TIMBERS
- TWO 2.4 METRE LENGTHS OF TREATED PINE
You can also use Redgum sleepers but the maximum length they come in is 3 metres. - 2 METRE WIDE by 4 METRES LONG PVC POND LINER
I bought mine by the metre but pond liner can also be bought in various set lengths and widths. - BARROWFUL OF FINE SAND (OPTIONAL)
- ROLE OF WEEDMAT
- 7 METRES OF 50 MM SLOTTED AGRICULTURAL DRAINAGE PIPE
You could also use 65 mm drainage pipe but I found 50 mm pipe to be adequate. - 50 MM DRAINAGE PIPE T SECTION
- 400 MM LENGTH OF 100 * MM DIAMETER PVC PIPE
- 100 * MM T SECTION
- 100 * TO 50 MM REDUCER
* I used 100 mm wide pipe so I could insert a low pressure float valve into it. Suggest you just use
90 mm pipe if you are not using a float valve as it is much cheaper. You could get away with as narrow as 65 mm, however using 90/100 mm pipe allows you to reach your hand into it should it need unblocking. - 400 MM LENGTH OF 90 MM DIAMETER PVC PIPE
- 20 MM THREADED TANK OUTLET
- AGRICULTURAL DRAINAGE STONES
- SOIL MIXTURE TO FILL THE BED
- CUT THE TWO 2.4 METRE LENGTHS OF LANDSCAPE TIMBER IN HALF
These are the end pieces. - CLAMP AND SCREW TWO 1.2 METRE AND TWO 3.6 METRE LENGTHS TO FORM THE FIRST SECTION OF THE WICKING BED FRAME
For details on how to do this see BUILDING A WOODEN RAISED BED FRAME. - REPEAT THE PROCESS UNTIL YOU HAVE TWO SECTIONS OF THE SAME SIZE
- LEVEL THE GROUND WHERE YOU WANT THE BED TO GO AND PLACE THE FIRST SECTION ON IT
- USE A SPRIT LEVEL TO MAKE FINE ADJUSTMENTS TO THE LEVEL
It is important that the section be precisely level, if it is not level then the wicking bed will not work properly when filled with water.

The first section being clamped and screwed together using 100 mm bugle baton screws. I dug this frame into the ground but on later wicking bed builds I placed it on level ground (a lot less work).
- PLACE THE SECOND SECTION ON THE FIRST SECTION AND FASTEN THE TWO TOGETHER WITH 250 MM NAILS OR SCREWS
You can use galvanised decking spike nails or Buildex Landscaping Construction Screws. If you use nails it helps to drill pilot holes.

The two sections after they have been nailed together to form the completed wicking bed frame.
- REMOVE ANY STONE OR SHARP OBJECTS ON THE GROUND INSIDE THE FRAME
It is important to do this as stones and sharp objects have the potential to perforate the pond lining. At this point a 2 cm layer of fine sand can be spread over the bottom to create an extra layer of protection against sharp objects. While I did this on later wicking bed builds I did not do it for this one. - DRILL THE OVERFLOW OUTLET HOLE
Halfway down one side of the bed drill a 22 millimetre hole so that the bottom of the hole is 10 cm above the bottom of the side of the bed. This is where the 20mm threaded tank outlet will be installed. - ROLL OUT LENGTHS OF WEEDMAT ALONG THE BOTTOM OF THE BED AND UP THE SIDES OF THE FRAME
The weed mat being secured to the sides with a staple gun. Make sure that there are no spaces between the weed mat and the ground. If there are air spaces when the pond liner is fixed into position the weight of water and stones could damage the liner. Note that when building later wicking beds I used builders plastic instead of weed mat for this layer. - LAY OUT POND LINER
Lay the PVC pond liner on top of the weedmat so that the liner is at least 20 centimetres high on the sides of the walls. Staple the pond liner to the walls to hold the liner in place, but make sure you only staple the very top of the pond liner at points above the intended high water mark . - INSERT 20 MM THREADED TANK OUTLET
Cut a hole through the pond liner and woven weed matting where it covers the overflow outlet hole you have drilled into the timber and insert the 20 mm threaded tank outlet. Screw in the threaded covers so the pond liner and weed matting is clamped firmly to the wood.
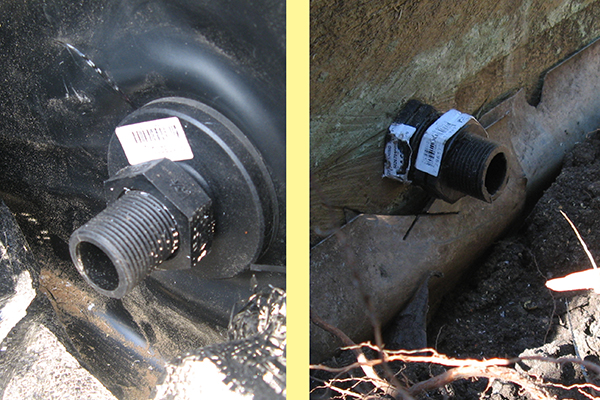
LEFT: Inside view of the threaded tank outlet after it has been screwed into place. RIGHT: The outside view. The wider flange should be on the inside and the pipe should stick out more on the inside.
- ADD ANOTHER LAYER OF WEEDMAT
Lay another layer of weedmat over the pond liner to a point just above the top of the pond liner. Use a staple gun to tack the top of the weedmat in place, making sure not to put any staples into the pond liner below the level of the threaded tank outlet. Where the weedmat covers the outlet cut a small hole in the weedmat to let the outlet poke through. This layer of weedmat is to protect the pond liner from the agricultural drainage stones that will be placed in it.
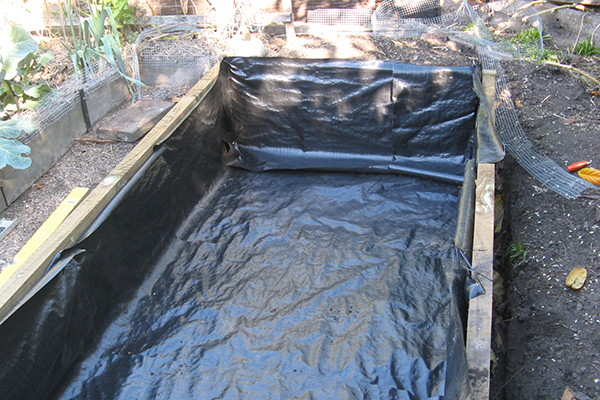
Photo of the weed mat in position. Staples are used to temporarily hold the weed mat in place before being permanently secured with button strews. But note that it is best not to put the button screws in until after the agricultural drainage stones have been placed in the bed.
- PREPARE THE PVC OUTLET/OBSERVATION PIPE
Take a 400 mm section of 90 mm PVC pipe and cut a 22 mm hole near one end so that when standing upright on the pond liner the hole is at the same height as the threaded tank outlet. Cut slots or drill holes at the lower end of the pipe. - PLACE THE PVC OUTLET/OBSERVATION PIPE
Hold the pipe upright with the 20 mm hole at the bottom and push the 20 mm threaded tank outlet through the 20 mm hole so that the PVC pipe stands upright. This pipe is there to stop the drainage stones and dirt clogging up the outlet pipe, it also offers an observation point to inspect the outlet valve. - ASSEMBLE THE INLET PIPE WITH ELBOW AND T PIECE
Take a 40 cm section of 100mm PVC pipe and connect to a 100 mm T piece. Where the T piece sticks out at right angles put in a 100 to 50 mm reducer. Connect a 50 mm T Piece to the end of the 50 mm reducer so that the two ends of the 50 mm T piece stick out horizontally. I used 100 mm PVC pipe with a 100 mm T piece to allow enough space for a low pressure float valve to be inserted into it. If you are not using a low pressure float valve than I suggest you use 90mm PVC pipe with an elbow instead of a T piece as it will be cheaper. You could even use all 50 mm pipe and do away with having to use a reducer, but this would give you too small an inlet for easy watering. - PLACE THE ASSEMBLED INLET PIPE
Place the completed inlet pipe section where you want it to go. In my case that was near the overflow outlet pipe but in can be placed anywhere on the edge of the wicking bed.
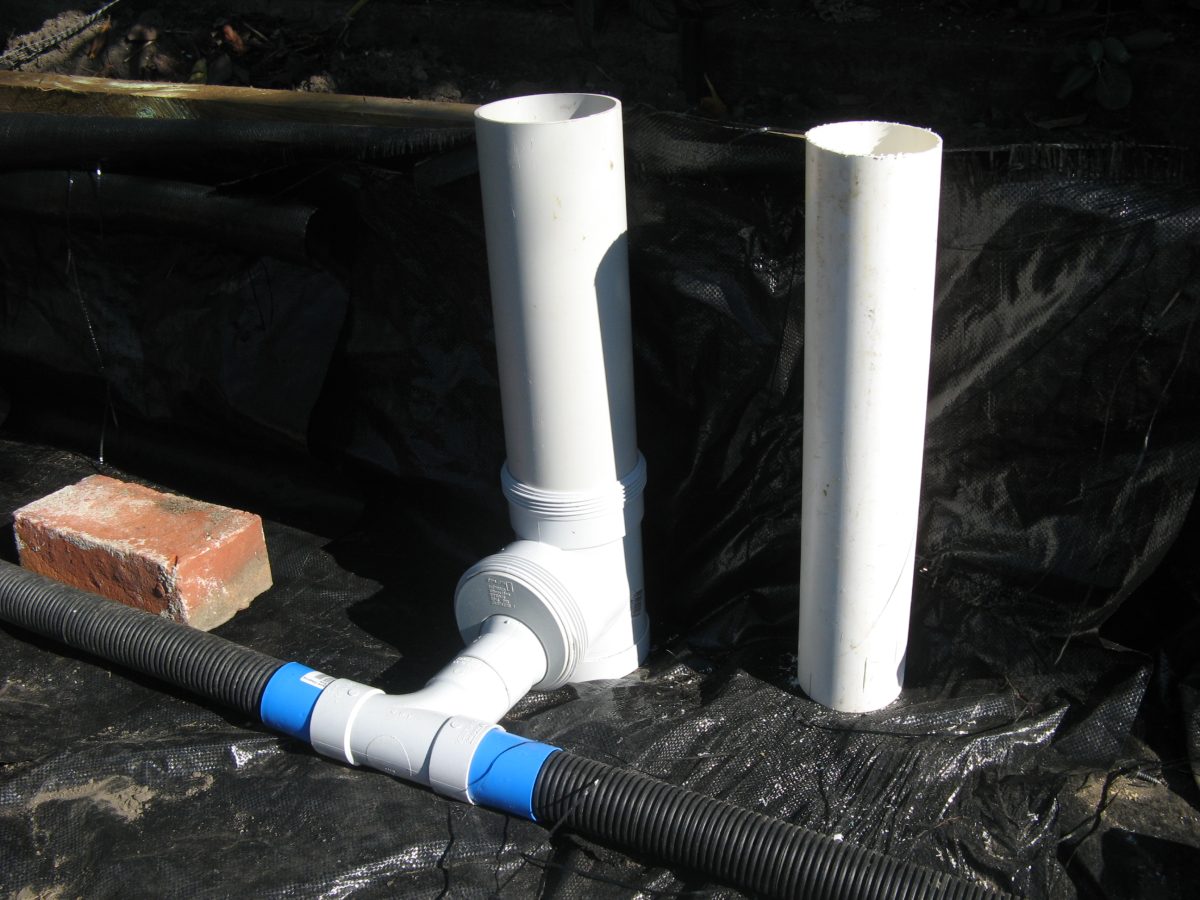
LEFT: The inlet pipe with its reducer and 50 mm T piece RIGHT: The outlet/observation pipe.
- LAY OUT THE DRAINAGE PIPE
Attach a length of 50 mm agricultural drainage pipe to one end of the 50 mm PVC T piece then snake it around the bottom of the wicking bed and attach the other end to the other side of the 50 mm T piece to form a loop. I used bricks to hold the drainage pipe in place.
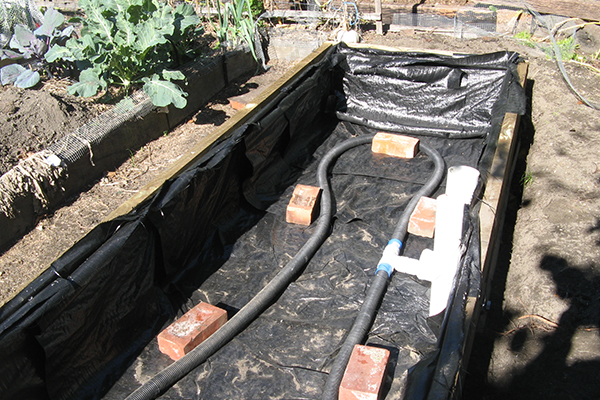
The agricultural drainage pipe after it has been laid out. The bricks are there to temporarily hold the pipe in place.
- SPREAD THE DRAINAGE STONES
Spread the agricultural drainage stones evenly across the bottom of the bed until the level of the stones sits just above the top of the threaded outlet valve. Remove the bricks supporting the drainage pipe as you do this.

The agricultural drainage stones being laid out just prior to the removal of the supporting bricks. On this occasion the drainage stones used are scoria, but I have also used bluestone. I prefer scoria as it is lighter, which makes it easier to handle.
- COVER THE DRAINAGE STONES WITH WEED MATTING
Cover the top of the stones with a layer of weed matting, tucking the matting firmly down along the edges. Where the PVC pipes stick up cut holes in the matting and push it over the tops of the pipes. This weed matting is there to keep the soil separate from the drainage stones/water reservoir below.
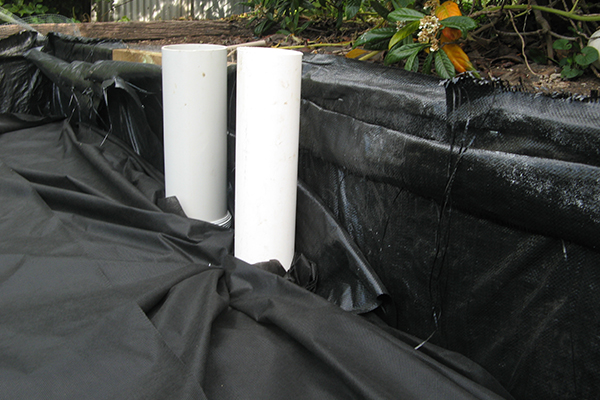
Weed matting covering the top of the drainage stones. To ensure full coverage holes were cut in the weedmat and pushed over the pipes.
- FILL THE BED WITH SOIL
Fill the bed with soil until it is three quarters full. For the best results the soil needs to be friable sandy soil. If your soil is heavy then mix it with sand and mulch to make it more friable.
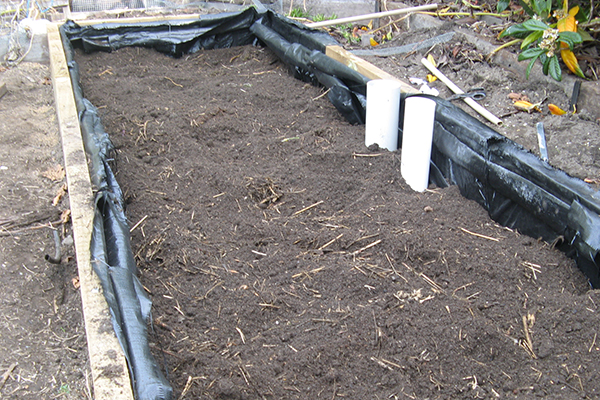
The wicking bed three quarter filled with a mixture of good quality soil with some straw added for organic matter.
- TACK THE SIDES OF THE WEEDMAT AND FILL TO THE TOP WITH MORE SOIL Fold over the woven weed matting at the top and tack it to the sides using 13 mm button head screws. Once this is done add more soil until just below the top.

The weedmat after it has been folded over at the top and button screws have been inserted to permanently hold it in place.
- TEST THE WATER RESERVOIR
Fill the reservoir by pouring water into it via the inlet pipe until water begins to flow out of the overflow outlet pipe. Leave for a couple of days and observe whether the water level has lowered in the reservoir, if it has not then you know that the pond lining is watertight. The wicking bed is now ready to be planted out.
As of writing this post this wicking bed is thirteen years old and still holds water. But while it still works well it had some shortfalls and I did do some adjustments to the bed to improve its performance.
- SOIL LAYER TOO SHALLOW
At just 30 centimetres high the level of the soil was not high enough for larger vegetables such as corn to grow in it comfortably. On a couple of occasions the roots of corn plants grew into the weedmat barrier above the irrigation pebbles, resulting in damage to the weedmat when the corn plants were removed. - SOIL TOO MOIST
The soil in wicking beds is moister closest to the reservoir at the bottom then at the top, the higher the layer of soil the drier it is close to the surface. But with such a shallow base even the soil close to the surface was wetter than I would have liked it. - RESERVOIR TOO SHALLOW
At just 15 cm high the reservoir did not hold enough water for my liking, it was adequate for small vegetables in mild weather but when growing large vegetables (such as corn) in warmer weather the reservoir would be sucked dry within three or four days. - MOSQUITOS BREEDING AT THE BASE OF THE INLET/OUTLET PIPES
Mosquitos would breed in the water at the base of the inlet/outlet valves. Few and not often, but enough to be a nuisance.
- RAISE THE HEIGHT OF THE WICKING BED
After just a couple of years I added an extra ten centimetres of height by ripping 20 cm landscape sleepers in half lengthwise and screwing them on top. Arguably I should have raised it by the full width of a landscape sleeper (20 cm).
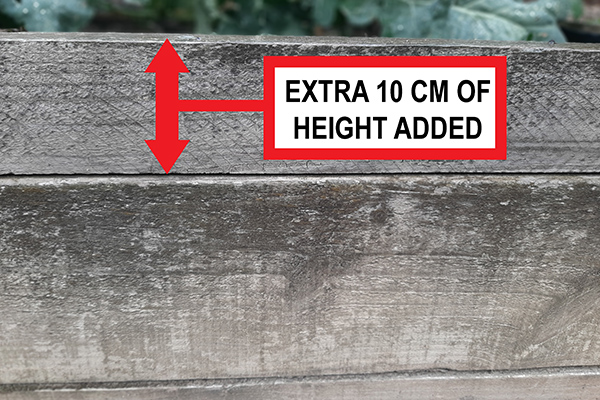
The extra 10 cm I added to the height of the wicking bed to make the soil section deeper.
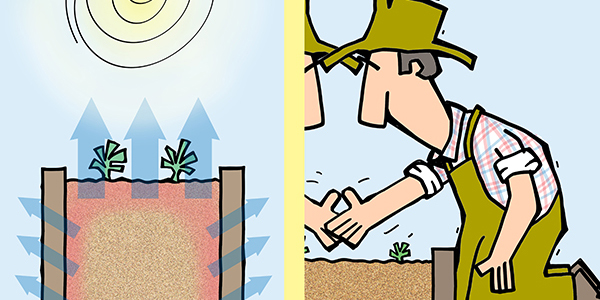
- PLACE THE WICKING BED RESERVOIR BELOW THE BASE OF THE WICKING BED
One option to avoid making the raised bed higher than 40cm would be to dig the pond liner reservoir into the ground. I would suggest 15cm but you could go even deeper. That way you could make both the reservoir and the soil chamber deeper without having to raise the height of the walls beyond 40 cm. It is the option I would use if I was making a wooden wicking bed today.

TOP: Illustration of the original build (though I dug my frame into the ground a bit). BOTTOM: Illustration of how you could make the soil level higher and the reservoir deeper without having to raise the height of the frame.
- COVER THE TOPS OF THE INLET/OUTLET PIPES
Cover the tops of the inlet/outlet pipes to stop mosquitos breeding in the water below. This could be done in several ways. For some of my PVC inlet/outlet pipes I modified PVC caps so they sit loosely on top. Others I put a plastic pot over the top, which seems to work just as well. The pot does not stop the mosquitos getting in but wrigglers need light to survive. Another alternative would be to simply stuff a rag down the pipe at the top.
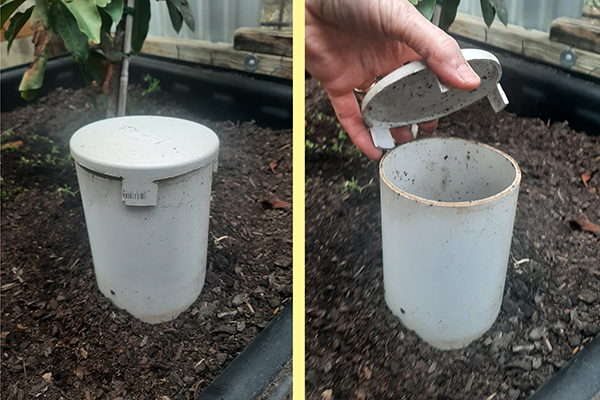
LEFT: Modified PVC cap on a wicking tub inlet pipe. RIGHT: The cap lifted to show how I modified it. If it wasn’t modified the fit of the cap would be too tight.
There are many wicking bed designs available on the internet, some of them a lot more sophisticated than this one. But the two wicking beds I built using these instructions have both worked perfectly well and, at the time of writing this, still working well after thirteen and ten years respectively.